Showing posts with label chocolate. Show all posts

Chocolate Glazed Peppermint Cookies

How about another one of those Christmas recipes I was talking about?

Oh these are so good. For the past two years, I've gotten Better Homes and Gardens Christmas cookie magazine that they publish every year. Completely worth it, you should invest in it later this year. Some of the best cookie recipes are in it. 
Including this one! I've been keeping an eye on this recipe for 2 years and I finally got around to making it last weekend. Better late than never right?
I love a recipe that does exactly what it says it's going to do and this one does it. 
They're kind of like the Girl Scout thin mints, except a little softer. But still crumbly, and minty, and good.

Chocolate-Glazed Peppermint Cookies

1 cup butter, softened
1 cup sugar
1/2 cup unsweetened cocoa powder
1 1/2 tsp baking powder
1/2 tsp salt
1 egg
1 tsp vanilla
2 1/2 cups flour

Chocolate Peppermint Coating

2 12 oz packages semisweet chocolate pieces
1/4 cup shortening
1/2 tsp peppermint extract
1/2 cup crushed peppermint candies (optional)

1. In a large bowl, beat butter with an electric mixer on medium to high speed for 30 seconds. Add sugar, cocoa powder, baking powder, and salt. Beat until combined, scraping bowl occasionally. Beat in egg and vanilla until combined. Beat in as much of the flour as you can with the mixer. Using a wooden spoon, stir in any remaining flour.
2. Divide dough in half. Shape each half into a 10-inch roll. Wrap each roll in plastic wrap or waxed paper. Chill about 1 hour or until dough is firm enough to slice.
3. Preheat oven to 375. Cut rolls into 1/4 inch slices. Place slices 1 inch apart on an ungreased cookie sheet. Bake for 6 to 8 minutes or until edges are firm. Transfer cookies to a wire rack; cool.
4. In a medium saucepan, combine the semisweet chocolate pieces, shortening, and peppermint extract. Cook and stir over medium low heat until chocolate and shortening are melted.
5. Dip each cookie into chocolate peppermint coating, turning to coat all sides of the cookie. Using a thin metal spatula, scrape off excess coating so cookie is covered with a thin layer (reheat coating as necessary). Place cookies on cookie sheets lined with wax paper. If desired, sprinkle with crushed candies while coating is still wet. Chill until coating is set.


Okay I will say this, you'll probably have chocolate coating left over. You'd probably be okay doing a little less than what it says, that's up to you though. Also, I put mine on wire racks to let the chocolate drip down, after being dipped. Then, I put them in the fridge for just a little bit to set up slightly, then removed them again so that they didn't set completely to the racks. Does that make sense? I let them set completely at room temperature. I was just worried about them setting up on cookie sheets with a pool of chocolate around them. I suppose if you really wanted to, you could set them up on a cookie sheet and just scrape off as much of the coating as possible, while still leaving the cookie covered.
These should be layered between sheets of waxed paper, in the fridge, to store them.


This is how the butter should look after it takes a beating!


Look, there's probably going to be jokes about this looking like poo wrapped in plastic. Just accept it and move on. They're good cookies. It's worth it.


This is how they should look after baking, see how the edges are set?


Mmmmmmm


Here's how you need to store them!
Merry Christmas!


Recipe source: Better Homes and Gardens

PB with some OC

This bar cookie has been swimming around inside my head for about a month or so.
Last week, I was watching "Ellen" with Maggie, when it all started to make more sense and I knew I had to try baking it.
I don't know if it was Ellen or Maggie that magically made it all come together, but we'll just thank both of them, shall we?

This was kind of a case of trial and error, like "Should I throw this in? Sure! How much of this? Maybe...not so much!" You know? I wasn't sure how it was going to turn out, so I tried making it twice and the second time turned out much better in my opinion.
Since I had two trial runs, and didn't want to make huge batches of either since I wasn't sure how these would turn out, the measurements are going to be kind of weird for some of the ingredients. Half of a cake mix? Half a can of sweetened condensed milk? I actually weighed the cake mix to get only half of it, and half of sweetened condensed milk I just eyeballed. You're more than welcome to make a batch the size that I did, in a 9x9 pan, or you can do a 9x13 pan. Just know that you'll need to double everything if you do that. If you DO make a 9x13 batch, you'll probably need two bags of Oreos. Just to be safe. You don't ever want to be short on Oreos...

And now, my brain child:

PB with some OC (peanut butter with some oreos and chocolate... I have a really hard time coming up with names for the recipes I create...)

 1 cup butter (2 sticks)
1 bag Oreos
1/2 of a chocolate cake mix
1 1/4 cups flour
1/2 cup peanut butter chips
1/2 cup chocolate chips
1/2 can sweetened condensed milk
1/4 cup peanut butter
additional chocolate chips for sprinkling

1. Melt one stick of butter, entirely, in the microwave. While it's melting, chop up the other one into 1/2 inch chunks. Add them into the bowl with the melted butter, toss to coat the unmelted chunks with the melted butter. Let sit for about 5 minutes. After the chunks have softened, stir it all together.
2. Meanwhile, line a 9x9 pan with foil and spray. Cover the bottom with whole Oreos. It took about 21 for my pan, and it won't perfectly cover the entire thing.
3. In a medium bowl, combine the cake mix with the flour. Pour in the butter. Add the peanut butter chips and the 1/2 cup chocolate chips. You will probably end up mixing those in by hand, since the cookie dough will be a little thick.
4. Press the cookie dough into the pan, over the Oreos. Make sure it's even and goes down into the empty spaces between the Oreos. Poke holes into the cookie dough, if desired.
5. Whisk together half a can of sweetened condensed milk and 1/4 cup peanut butter, spread over the cookie dough. If you did poke holes, then the milk mixture should go down into those.
6. Sprinkle the top with as many crushed Oreos as you'd like, and some chocolate chips. Use as much or as little as you like. Press them lightly into the milk mixture.
7. Bake at 350 for 25 minutes or so. The edges should be browned, and the center just set. Let cool on a rack for 5 minutes, then run a knife around the edges. Let it cool completely. Remove from pan with foil and cut into bars.


See, the Oreos won't go in perfect lines? But that's okay, cuz you'll be shoving cookie dough in between them!


Mmmm. I had some of those chocolate chunks, so I used those instead of chips. Really good.


If you want to poke holes into the dough, you can, but you don't have to. I just thought it would be tasty to have some of the milk mixture baked into the dough. And it was.


Before baking. Just be sure and press the chips and Oreos into the mixture slightly, so that they don't all fall off after baking.


And it's done! See the browned edges? 


All of the pictures I took of these afterwards were AWFUL. This is the best I could get. You can see the on the one on the left, one of the sections where the milk mixture baked down into the dough. 
These are crumbly and gooey all at the same time. It's really delicious. 
You could even try this with different cake mixes and chips if you wanted, leave the peanut butter out, and just pour sweetened condensed milk on top. Lots of flavor combination possibilities!


Recipe source: mi cabeza

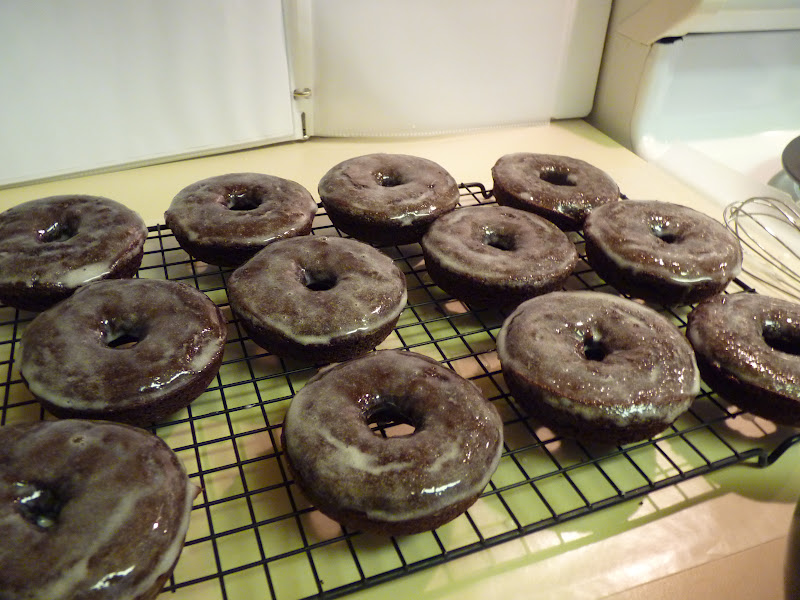
Chocolate Cinnamon Cake Donuts

Have you invested in donut pans yet? Well why not?? 
Here's a good reason why: today's recipe.
I loooooooove my donut pants. I bought them with birthday money, back in November, and those pans and I have never looked back. So far, I've made vanilla and two different kinds of chocolate. The chocolate ones have been my favorite, and this one takes the cake! Donut. Cake donut. Get it?

Anyways, chocolate and cinnamon together is a very good combination. In fact I recommend mixing in the amount on the recipe, and then add more to your taste. I probably ended up putting in a whole teaspoon. I just felt it wasn't coming out enough in the batter. It's up to you :) Also, if you don't want to make the glaze (you totally should) then you can sprinkle powdered sugar on them.


Chocolate Cinnamon Cake Donuts

Ingredients:
1 cup Flour
1 cup Sugar
3/4 cup Cocoa Powder
1 teaspoon Baking Soda
1/2 teaspoon Baking Powder
1/4 teaspoon Salt
1/4 teaspoon Ground Cinnamon
3/4 cup Buttermilk
1/4 cup Canola Oil or Applesauce
1/2 teaspoon Vanilla
1 egg

Directions:
Preheat your oven to 350 degrees. Spray donut pans with cooking spray. 
In a medium bowl, whisk together the egg, buttermilk (I use buttermilk powder), oil and vanilla. Set aside. In a large bowl, whisk together all of the dry ingredients. Pour the buttermilk mixture into the dry ingredients and stir until combined. Fill the prepared doughnut pan 2/3 full and bake about 12 minutes or when a tester is inserted it comes out clean. Let cool before removing and finish on a baking rack. For the glaze, combine 1 cup powdered sugar to 4TB milk. Whisk until smooth. Dunk cooled donuts into glaze and let cool on a wired rack for the glaze to harden.


When I fill my donut pan, I put all of the batter into a gallon sized ziploc bag (although a quart would probably suffice for this recipe) and snip off a corner like so. It just makes it easier to fill the compartments. Although it's still as messy as using a spoon. Either way, you'll have a mess on your hands. A chocolatey, cinnamony mess.
Mmmmmm


Here they are before baking. Try and make sure there isn't a lot of batter on the center part of the donut, or else they will bake weird. 


And after! As you can see, I was not as good at eyeballing each donuts amount as I thought I was.


The pretty side.


I did the glaze, and I dunked the ugly side (the side not in the pan when baking). I just dunked them right into the bowl that I mixed the glaze in. After dunking them all once, I let them set for a minute and then did it again. Because you can't have enough glaze.

Seriously though, these are really easy to mix up on a busy OR lazy morning, and very delicious too. Definitely do the glaze! Or powdered sugar. But definitely, the glaze.

Recipe Source: Finding Frenchie

Tuxedo Cake

Today is Pi day (3/14. Get it?), and most food bloggers are blogging pie.
As we all well know, I am not most food bloggers. Most food bloggers have decent cameras and also something called "natural lighting" in their fabulous kitchens and endless different kinds of cupcake wrappers. Also, they're not as awkward as I am.

So, in honor of dancing to the beat of my own drum (or accordion, you know, for Irish dancing), I bring you cake.

I don't have a favorite cake, when it comes to eating them. How do you pick a favorite child?
This cake, however, may, hands down, be my favorite cake to MAKE, ever.

This is for a couple of reasons.
Number 1:
It's GORGEOUS.
Number 2:
Making it, and thereby making it GORGEOUS, is an easy thing to do.

I'm not even kidding. If you would like to make a fabulous dessert that looks fabulous and tastes fabulous and is fabulously easy, this is it. Chances are, you have most of the ingredients already, with the exception of one or two. Also, it could feed an army.
Three layers, THREE LAYERS OF CHOCOLATELY GOODNESS! And a really easy whipped cream frosting. Top all of that off with ganache. Doesn't ganache just make everything even better than it already is?
(p.s. you are going to want to use the biggest bowl you own to mix up the cake. Seriously. Huge. And you might cry when you see the length of the directions, but trust me, you can do it.)


Tuxedo Cake

For the cake:
1 cup (2 sticks) unsalted butter
2 cups water
1 cup canola oil
4 cups sugar
1 cup unsweetened cocoa powder
4 cups flour
4 large eggs
1 cup buttermilk
1 TB baking soda
1/2 tsp salt
1 TB vanilla extract

For the frosting:
4 cups chilled heavy whipping cream
1 1/4 cups powdered sugar

For the chocolate glaze:
4 oz high-quality bittersweet chocolate, chopped into small pieces
1/2 cup heavy whipping cream
1/4 cup Lyle's Golden Syrup
2 tsp vanilla

To make the cake:
For a 3-layer cake, place one baking rack one-third from the bottom of the oven and the second two-thirds from the bottom. Preheat oven to 350. Line the bottom of three 9 inch, or two 10 inch (if doing a 2-layer cake) cake pans with parchment paper rounds, grease with butter and dust with flour.

Combine the butter, water, and canola oil in a medium saucepan set over medium heat. In a large bowl, stir together the sugar, cocoa, and flour. Pour the butter mixture into the sugar mixture and whisk until smooth. Whisk in the eggs, one at a time, then whisk in the buttermilk. Whisk in the baking soda, salt, and vanilla all at once. Transfer the batter to the prepared pans. For the 3-layer cake, stagger the cake layers on the oven racks so that no layer is directly over another. Set two layers on one rack and the third on the other. For a 2-layer cake, stagger the layers on the middle rack with one placed more toward the front of the oven and one toward the back. Bake for 35 to 40 minutes, or until a toothpick inserted in the middle of each layer comes out clean. Monitor the layers carefully for doneness; each one may be done at a different time.

Remove the cakes from the oven and cool on racks for about 15 minutes before inverting onto baking racks. Cool the cakes completely, at least 2 hours, before frosting.

To make the frosting: Using a mixer fitted with a whisk attachment, whip the cream in a large bowl on high speed until soft peaks form. Add the powdered sugar and whip until thoroughly combined.

Place 1 cake layer on a platter and spread some of the frosting over the top. Top with the remaining layer or layers, thickly coating the top and sides of each with frosting.
Refrigerated the cake until the whipped cream frosting has stabilized, at least 1 hour (Mine took longer, I would plan on letting it refrigerate for 4 hours minimum, just to be safe.)

To make the glaze: Place the chocolate in a medium bowl. Heat the cream in a small saucepan over medium heat until it is very hot and just beginning to steam. Pour the hot cream over the chocolate and stir until it has melted completely. Stir in the syrup and vanilla. Pour the glaze into a medium pitcher or measuring cup and let cool for 10 minutes. Do not let the glaze sit longer because it will stiffen and become difficult to pour over the cake. Slowly pour the glaze over the cake, ensuring that it covers the top and drizzles down the sides. Cover the of the cake entirely, but make sure some of the cream frosting shows through the drizzles on the sides. (If the glaze doesn't flow easily over the edge of the cake, don't be afraid to add an extra tablespoon or two of the golden syrup.)

Refrigerate the cake until the glaze is set and the whipped cream frosting is firm, at least 1 hour. Slice the cake with a long serrated knife, dipping it in a tall glass of hot water between each slice.
The refrigerated cake will keep for about 2 days.


See? Big bowl. This is the biggest bowl I have and it was still pushing it. I just made sure to mix the ingredients in slowly at first, and then whisked after they were slightly incorporated.


Sorry for the blurriness. The placement of the cakes was kind of weird. And follow the recipe's advice, check them all periodically because they probably won't all be done at the same time.


But it's worth the weirdness of baking 3 layers at once, right? :)


Mmmmm. Frosting.


At this point, I probably could've eaten it like this and been happy.


No, the cake didn't turn yellow, that's just my fantastic lighting. Here it is all frosted and ready to sit in the fridge. Again, mine took about 4 hours until the frosting was set how I wanted it to be.


And Pete was cute taking a nap in the middle of all of this.


This is Lyle's Golden Syrup! I found mine at HEB with the breakfast and Caro syrups.


Here is something that I learned about ganache from a truffle class I took a couple of years ago. When you add warm cream to chopped up chocolate, let it sit for a couple of minutes to soften up the chocolate before stirring. This will be very hard, because you will want to start stirring immediately. Fight the urge! It will blend more easily if you let it sit first :)


You don't need a huge container for the ganache part. Mine fit just fine into my 1 cup glass.


At this point I should tell you that this cake was going to be traveling. I do not recommend this cake for traveling. 
Right before I mixed up the ganache to pour on top, I started having visions of driving this cake from our place to Mike's parents' place and having 3 layers of cake going 3 different directions with every turn. So I called up my friend and asked if she had skewers (it was Sunday or else I would've gone out and bought some) and luckily she did! (this paid off for her, as I took a fourth of the cake to her later that night. See how I trade food for goods?)
So, if you feel the need to take this cake somewhere other than your own table (possible, but again, I don't recommend it) then I would add skewers for stability while traveling.


It was at this point when I almost started singing. I couldn't believe how PERFECTLY the glaze was going down the sides! I mean isn't that beautiful?


Be careful not to pull away from the cake too much though, as you pour, or you'll end up with random spots like this.


Look at that. I know. I KNOW. This is wonderfully moist and rich so it won't take much for one person. 
Also, Mike's aunt Susan was visiting for the weekend, and her birthday is coming up, so it became a birthday cake! Yay!
Happy birthday Susan!!!


Recipe Source: The Pastry Queen, Rebecca Rather (this is a GREAT book, I can't wait to get it for myself someday, rather than just checking it out of the library all of the time :-))

Oreo Fudge Bars

It is my humble opinion that one cannot have too many recipes involving Oreo's.
Or root beer.
But this is about Oreo's.
You'd think that eventually people would run out of ways to make them even more delicious, but no. I think it's some sort of gift of the Spirit for Oreo recipes to keep appearing as if from thin air. And I happily oblige them, because they want to be baked, these recipes. They do. And so I do. I bake them I mean. I don't want to be baked myself. In an oven, or from smoking pot...

This post is getting ridiculous, so how about a recipe that wants to be baked? In the oven...


Oreo Fudge Bars

1 16oz. package of Oreo cookies 
1 stick butter, melted
1/4 tsp satl
1 (14 ounce) can sweetened condensed milk 
1 teaspoon vanilla extract 
3/4 cup semi-sweet chocolate chips
1/2 cup milk chocolate chips (could use another 1/2 cup  semi-sweet chips if you like)
1/2 cup mini chocolate chips 


Preheat the oven to 325. 
Line a 9×13 pan with foil and lightly spray with PAM.
Set aside 6 Oreo cookies for the toppings.
In a small food processor grind the rest of the cookies. If you don’t have a food processor, just pound with a rolling pin until the cookies are fine crumbs. Add the salt to the crumbs and stir to combine.
Melt butter and gently stir together with the cookie crumb mixutre. 
Press firmly into the bottom of the prepared pan.  
Coarsely chop the remaining cookies into chunks and set aside.
Over a double boiler or in the microwave, melt 3/4 cup semi-sweet and 1/2 cup milk chocoalte chips together with the condensed milk and vanilla.
Stir frequently until smooth.
Spread evenly over the prepared cookie crust.
Sprinkle the mini chocolate chips and the Oreo cookies chunks over the top of the filling. Press down gently into the chocolate topping. 
Bake for 20-22 minutes oven.
Allow to cool on counter for 1 hour. Chill in fridge until completely cold and set before cutting into bars or it will make a big mess.


Hi, Sandi here again. Something I might throw in here is, after they've cooled for an hour, drizzle some melted white chocolate on top. Don't question it, just do it. Other than that, you are good! Except, really, do NOT cut these into bars until it's been refrigerated or you will have one heck of a chocolate mess to clean up. Unless that's your kind of thing? Also, once this is chilled, you will want a sharp knife to cut into it, as the base will harden considerably. The base is my FAVORITE part! The salt and the crushed up, buttery Oreos is fantastic.


Also, I plan on trying this again with mint Oreo's and Andes mint chunks on top instead of mini chips. Right???


Mmmm. Crust and topping. Together at last. It's a happy marriage.


Before baking.
Definitely don't forget to push the chips and cookie pieces into the batter slight. I did, and I had a lot of loose pieces after it was done.


It will look pretty much the same when it's done baking. The fudge part should look more set, though.


This is a pretty good way to eat them.


Recipe Source: Baking Blonde

Stacey's Birthday Cupcakes

I have a stupendous friend named Stacey. She's beautiful and selfless and gives birth to the cutest little people. And TODAY is her birthday!
Stacey and I are leaders over the 12 and 13 year old girls at church, and last night, at our activity with them, we decided to chow down on some cupcakes to celebrate the event.
This is a recipe that could potentially fall under the category of "baking my way through 'Our Best Bites' dessert section." I say potentially because I changed the recipe. A bit. You'll see. Just know that these (the way I did them) turned out rich and delicious and oh my gosh can you really go wrong with chocolate AND peanut butter? I will revisit it again sometime and make it the way they did. Or maybe not. I mean, these turned out really really good...

I'm going to post the original recipe, and then I'll leave my psychotic notes of things I changed. You know, like I always do :)


Chocolate Peanut Butter Cup Cupcakes

Triple Chocolate Peppermint Treats

Remember how I'm on a quest to find a delicious chocolate, brownie type cookie, with delectable frosting and candy cane kisses on top? Remember? WELL I DID IT!

Okay, so the cookie ended up not being a brownie cookie, but oh my gosh y'all, this is a fantastic treat. I had a few people send me good ideas for recipes that were similar to this, and I can pretty much guarantee I will probably end up making all of them at some point or another...
But then I got a Taste of Home email the other day, and this cookie was in it but with crushed up starlight mints on top. I looked at it and I thought "That's cream cheese frosting, I bet chopped up candy cane kisses would be quite yummy on top of that!" And, well, at the risk of sounding like a genius, I was right.

So here you are, a delicious Christmas time treat! (And I PROMISE, I will be getting my mom's caramel recipe to you BEFORE Christmas...)


Triple-Chocolate Peppermint Treats

Ingredients

  • 1 cup butter, softened
  • 1 cup packed brown sugar
  • 1/2 cup sugar
  • 2 eggs
  • 2 teaspoons Spice Islands® pure vanilla extract
  • 2-1/2 cups all-purpose flour
  • 3/4 cup baking cocoa
  • 1 teaspoon salt
  • 1 teaspoon baking soda
  • 1 cup (6 ounces) semisweet chocolate chips
  • 1/2 cup 60% cacao bittersweet chocolate baking chips

  • WHITE CHOCOLATE FROSTING:
  • 1/2 cup white baking chips
  • 4 ounces cream cheese, softened
  • 3 cups confectioners' sugar
  • 1/3 to 1/2 cup crushed peppermint candies (or candy cane kisses!!!)

Directions:

  • In a large bowl, cream butter and sugars until light and fluffy. Beat in eggs and vanilla. Combine the flour, cocoa, salt and baking soda; gradually add to creamed mixture and mix well. Stir in the chocolate chips.
  • Drop by rounded teaspoonfuls 2 in. apart onto ungreased baking sheets. Bake at 375° for 8-10 minutes or until set. Cool for 2 minutes before removing to wire racks to cool completely.
  • In a microwave, melt baking chips; stir until smooth. Cool.
  • In a small bowl, beat cream cheese and confectioners' sugar until smooth. Beat in melted chips. Frost cookies; sprinkle with peppermint candies. 

*My only side note, I think a teaspoon is a ridiculously small amount of dough to make a cookie. I did about a tablespoon of dough for each and I got 5 dozen out of this. I also put about a tablespoon of frosting on top of each one and it was practically perfect in every way. Also, when sprinkling on the kisses (or mints), push them into the frosting a little bit. And above all else, for the love, please enjoy these! 
Mike said he could've eaten a whole plate of the cookies by themselves, without the topping. It's all good, either way :)


Anticipaaaaaaaaaaaaation!!!! (read that as if Oprah was saying it)


I flattened them slightly, before baking. It's a very thick dough and won't spread much. You don't have to flatten it, but I prefer flat cookies to round ones. This is suddenly sounding like a conversation about boobs...


I know, right?


It's delicious people!!!!


Recipe source: Taste of Home