Showing posts with label breakfast. Show all posts

Chocolate Cinnamon Cake Donuts

Have you invested in donut pans yet? Well why not?? 
Here's a good reason why: today's recipe.
I loooooooove my donut pants. I bought them with birthday money, back in November, and those pans and I have never looked back. So far, I've made vanilla and two different kinds of chocolate. The chocolate ones have been my favorite, and this one takes the cake! Donut. Cake donut. Get it?

Anyways, chocolate and cinnamon together is a very good combination. In fact I recommend mixing in the amount on the recipe, and then add more to your taste. I probably ended up putting in a whole teaspoon. I just felt it wasn't coming out enough in the batter. It's up to you :) Also, if you don't want to make the glaze (you totally should) then you can sprinkle powdered sugar on them.


Chocolate Cinnamon Cake Donuts

Ingredients:
1 cup Flour
1 cup Sugar
3/4 cup Cocoa Powder
1 teaspoon Baking Soda
1/2 teaspoon Baking Powder
1/4 teaspoon Salt
1/4 teaspoon Ground Cinnamon
3/4 cup Buttermilk
1/4 cup Canola Oil or Applesauce
1/2 teaspoon Vanilla
1 egg

Directions:
Preheat your oven to 350 degrees. Spray donut pans with cooking spray. 
In a medium bowl, whisk together the egg, buttermilk (I use buttermilk powder), oil and vanilla. Set aside. In a large bowl, whisk together all of the dry ingredients. Pour the buttermilk mixture into the dry ingredients and stir until combined. Fill the prepared doughnut pan 2/3 full and bake about 12 minutes or when a tester is inserted it comes out clean. Let cool before removing and finish on a baking rack. For the glaze, combine 1 cup powdered sugar to 4TB milk. Whisk until smooth. Dunk cooled donuts into glaze and let cool on a wired rack for the glaze to harden.


When I fill my donut pan, I put all of the batter into a gallon sized ziploc bag (although a quart would probably suffice for this recipe) and snip off a corner like so. It just makes it easier to fill the compartments. Although it's still as messy as using a spoon. Either way, you'll have a mess on your hands. A chocolatey, cinnamony mess.
Mmmmmm


Here they are before baking. Try and make sure there isn't a lot of batter on the center part of the donut, or else they will bake weird. 


And after! As you can see, I was not as good at eyeballing each donuts amount as I thought I was.


The pretty side.
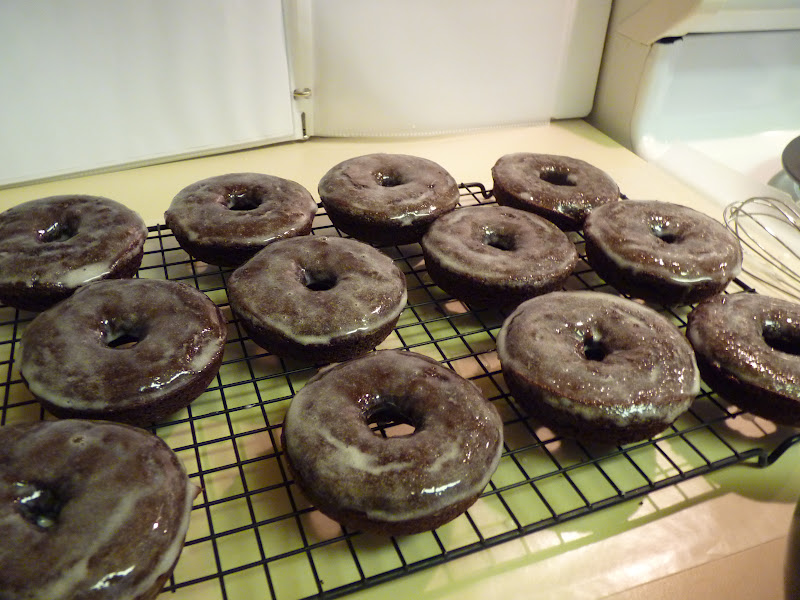

I did the glaze, and I dunked the ugly side (the side not in the pan when baking). I just dunked them right into the bowl that I mixed the glaze in. After dunking them all once, I let them set for a minute and then did it again. Because you can't have enough glaze.

Seriously though, these are really easy to mix up on a busy OR lazy morning, and very delicious too. Definitely do the glaze! Or powdered sugar. But definitely, the glaze.

Recipe Source: Finding Frenchie

English Muffin Bread

Okay. I've baked a few loaves/forms of bread in my time. I am in no way an expert, but I can find my way around a yeast bread.
This. Was. The. Weirdest. Dough. I've. Ever. Seen.
I love English muffins, and I've always wanted to make some. Typically, they require rings to put the dough in though (to keep the round shape) and I don't have those so I've put it off. When I saw that there was a loaf of bread like unto English muffins, I jumped on it!
I think I know now why English muffins are griddled in rings. The dough was more like batter. If they weren't griddled in rings they'd turn into weird, bready pancakes because they'd spread all over.
The whole time I was making this bread, I kept thinking "I've messed up. I totally messed up somewhere. Something is wrong." But no! I got two awesome loaves of bread from the batter-like dough!
With that being said, I had these puppies mixed up, rising, and in the oven within an hour. AN. HOUR. I know! And if you are timid of yeast breads, try this. It's impossible, IMPOSSIBLE I TELL YOU!, to mess it up.

Also, if you are as fortunate as I am, you will be able to trade one of the loaves for a brand new crepe pan (thanks again Elisabeth!).

Can you shake a stick that that? I tell you that you cannot.

*The original recipe was too lackadaisical for me. I did not like the lack of consideration for the yeast bread making process, so I'm going to adapt it to the way I made it.


English Muffin Bread


2 and 3/4 cups warm water (between 105-115 degrees)
3 and 1/4 teaspoons plus another 1/8 teaspoon yeast 

(I know that's weird but the original recipe was for 4 loaves and I halved all of these, if you want to make it easier on yourself, do 1 and a half packages of yeast)
1 Tablespoon salt
1 and 1/2 Tablespoons sugar
5 and 1/2 cups flour


1. Combine water, yeast and sugar. Let sit for a couple of minutes.
2. Add flour, and then salt. Mix all ingredients well. Let stand until doubled.
3. Distribute dough between 2 greased loaf pans. Let stand until it reaches the top edges of the pans.
4. Bake at 350 for 35 minutes. Brush the tops of the loaves with melted butter and then bake another 10 minutes, or until golden brown.


TA DA! So easy. I recommend toasting a slice and then adding butter and jam. Yum.


Here's what the water/sugar/yeast should look like after a couple of minutes. Just let it sit long enough for the yeast to really activate. You can't mess this up, remember?


Okay, do you see this? Do you see why I thought I was losing my mind? Does this look like DOUGH? NO! But this is what the dough should look like :)


Before rising.


After rising. 
Let it go all the way to the top! Be sure and have the oven preheated so you can put both loaves right in.


Here they are pre-buttering.


Mmmmm. Nice and golden.


Do you see all of the English muffin-like goodness going on there? 
This is really easy and good bread!

Recipe source: adapted from Pinching Your Pennies

Cinnamon Sugar Pull Apart Bread

Or as I like to call it, vomit bread. Which is what it did all over my oven.

This bread was really good. I made it for breakfast on the Sunday morning of General Conference. I always try and make something fun or new for breakfast on conference weekend, and this is what Mike picked. I love the idea of breads for breakfast, but how do you make them, so they're fresh out of the oven, without getting up at 5 in the morning to make it or having breakfast at noon?? I did a little shortcut with this recipe.
I had never made a bread dough up to the point where you can refrigerate it and then leave it over night. I was scared about that, but it worked out totally fine! Until the baking happened...We'll get to that later. I wish the blogger that I got this from just gave more tips and advice in her posts. I love her blog, but she's got one of those fancy shmancy blogs where she says things like "I've never even tasted store bought icing or used a loaf of frozen bread dough bought at the store" and blah blah blah. One can only hope to aspire to be as FANTASTIC as that...
Anyways, still a great blog with amazing recipes, just not a fan of her style.


Cinnamon Sugar Pull-Apart Bread
Yield: one 9 x 5" loaf
Ingredients:
For the dough:
2¾ cups all-purpose flour, plus more as needed
¼ cup granulated sugar
2¼ tsp. instant yeast
½ tsp. salt
4 tbsp. unsalted butter
1/3 cup whole milk
¼ cup water
1 tsp. vanilla extract
2 large eggs
For the filling:
4 tbsp. unsalted butter
1 cup sugar
2 tsp. ground cinnamon
½ tsp. freshly grated nutmeg
Directions:
To make the dough, combine the flour, sugar, yeast and salt in the bowl of a mixer fitted with a dough hook.  Combine the butter and milk in a small saucepan and heat just until the butter is melted.  Set aside and let cool briefly, until the mixture registers 115-125˚ F on an instant-read thermometer.  Add the milk mixture, water, vanilla and eggs to the mixer bowl.  Mix on low speed until a cohesive dough forms.  Continue to knead until smooth and elastic, adding additional flour as needed 1 tablespoon at a time until the dough clears the sides of the bowl and is tacky but not sticky.  Knead about 3-5 minutes.  Transfer the dough to a lightly oiled bowl, turning once to coat, and cover.  Let rise in a warm place until doubled in bulk, about 1 hour.  (After the dough has doubled, it can be wrapped in plastic wrap and refrigerated overnight.  Let stand at room temperature 30 minutes before proceeding.)
While the dough rises, add the butter to a small saucepan and melt until browned.  Set aside.  Combine the sugar, cinnamon and nutmeg in a small bowl and mix well.  
Transfer the dough to a lightly floured work surface and gently deflate.  Roll into a ball, cover with a clean towel and let rest for 5 minutes.  Roll the dough out into an approximately 12 x 20-inch rectangle.  Brush the dough with the browned butter.  Sprinkle the cinnamon-sugar mixture over the dough in an even layer.  (Yes, really, use all of it.)  
Lightly grease a 9 x 5-inch loaf pan.  Slice the dough vertically into 6 even strips.  Stack the strips on top of each other and again cut again into 6 equal slices.  Stack all the squares on top of each other and set into the prepared loaf pan.  Cover loosely with a kitchen towel and let rise in a warm place, 30-45 minutes.  
Preheat the oven to 350˚ F.  Transfer the loaf to the oven and bake 30-35 minutes, until the top is golden brown.  (If the top seems to be browning too quickly, cover loosely with foil at the end of baking.)  Remove from the oven and let rest in the pan 20-30 minutes.  Run a knife around the edges of the pan to loosen and carefully turn the loaf out, transferring to a serving plate.  Serve warm.  


*I'm not the biggest fan of browned butter. I just melted mine in the microwave for a few seconds and it turned out fine.


By show of hands, who can see what I did wrong here? If you read the recipe, you would know that I was supposed to put the butter and cinnamon and sugar on top before slicing. Yeah....


Here are the strips stacked the first time...


...and after being sliced a second time!


This is where I might have gone wrong? Although I'm not sure? I think I should have smushed them together better when putting them in the pan.


This was the point when I knew that refrigerating the dough over night had actually worked. The dough rose in the pan! I was so excited. But wait...


This is where things took a turn for the dumb. As I was putting the pan in the oven, I thought "Maybe I should put this on a cookie sheet. No no, she would've said something on the blog about that." She didn't. She should have. The combination of cinnamon, sugar, and butter has a tendency to bubble over and make a mess.


It throws up in your oven if you will. Also, see that down there? That's one of the squares of bread. Stuck to the bottom of my oven. It was so fun to clean this between conference sessions. It was even more fun to smell burned cinnamon rolls every time I turned on the oven for a week after this.


Ta da......?

Honestly, I'll probably give this one more shot somewhere down the road, trying things a little differently. If it goes the same, then I rid myself of it!

Recipe Source: Annie's Eats

Cream Scones

I've been meaning to blog about the next few recipes I'll be posting about a week ago. Last week just got away from me! And then this weekend, well it was raining and "cold" and who wants to do anything but sit around eating and watching movies?

Anyways, this is hands down, Mike's favorite breakfast. I think I can safely say that. He suggests that I make these scones on a weekly basis. These are AWESOME! However, I don't want you to make them and then live under the delusion that you've made legitimate, English tea-time scones. Far from it. This is very Americanized. But also very yummy :) The recipe calls for a food processor but you could definitely do it without one. Although I'm in love with mine and if you don't have one, I recommend you get one. They have ever so many uses!

Cream Scones

2 cups flour
1/4 cup sugar
2 1/2 tsp baking powder
1/4 tsp salt
1 stick cold unsalted butter, cut into 1/2 inch cubes
1 cup chilled heavy whipping cream
1 egg lightly beaten
1 TB sugar, or for more crunch, 2 TB turbinado or raw sugar

1. Preheat the oven to 425 and position oven rack in the center. Line a baking sheet with parchment paper or a thin silicone mat. Place the flour, sugar, baking powder, and salt in the bowl of the food processor and process for 10 seconds to blend well. Add the cold butter pieces and pulse 5 times at 1-second intervals, or until the butter is cut into medium pieces. Add the cream and pulse another 20 times, or until the dough holds together in small, thick clumps. Use a spatula to scrape the dough out onto a lightly floured work surface. Gently squeeze the clumps together until they form a cohesive dough.

2. Pat the dough into a circle 7 inches in diameter and about 1 inch thick. Use a chef's knife (or just any big, sharp knife) to cut the dough into 8 equal wedges and transfer to the prepared baking sheet, spacing them 2 inches apart.

3. Brush the tops with a thin coating of the lightly beaten egg (you will not use all of the egg). Sprinkle evenly with sugar. Bake the scones for 14 to 16 minutes, until firm to the touch and golden brown. Transfer for a rack and let cool for 5 minutes. Serve scones warm or at room temperature.

*Here's the Sandi Side Notes! For one thing, I never do the egg wash. I hate wasting most of an egg, so I just sprinkle the sugar on without the egg wash and it sticks just fine. Granted, without the egg wash you won't have a nice golden brown on top, but I'm willing to make that sacrifice... Also, it usually takes me more than 5 pulses to get the butter down the size it's supposed to be at when I add it to the dry ingredients. And usually, USUALLY, after I add in the heavy cream, I usually add in some additional flour as well (which I guess I could just do initially when I add the flour in...). Sometimes the dough is just too moist and the scones will spread all over the place when baking. They'll still taste the same, just not as pretty.


This is about what it should look like after you mix the butter in.


Here's the circle of dough! Before it gets sliced...


And here it is sliced! I like to use turbinado sugar on these. Regular sugar works great, but I think it's worth the splurge to use turbinado :)


And DONE! These are fantastic. It's a solid quick bread type pastry, but it really has a creamy texture when you eat it.