Soft Breadsticks with Garlic Butter
1 1/4 cups warm water (105- 115 degrees) *I strongly urge you to measure the water to make sure it falls in that temperature zone. If it's not the right temperature then the chances of your bread coming out properly are slim. Go get a good candy thermometer to measure it and then use THAT to make candy :) THIS IS A TOTAL WIN WIN SITUATION!!!
3 TB grated parmesan cheese
2 TB olive oil
2 TB honey (Use the same measuring spoon to do the olive oil and honey. Measure the oil with it first and the honey will just slide right out!)
1 package dry yeast (active or instant, it doesn't matter, you will get the same results) or 2 1/4 tsp dry yeast
3 cups bread flour *You MUST use bread flour or these will not turn out right at all*
1 tsp dried basil, crushed
1 tsp salt
3 TB butter, melted
2 tsp garlic powder
1. In a large mixing bowl, combine water, cheese, olive oil, honey, and yeast; stir to combine. Let stand for 5 to 10 minutes or until foamy.
2. Add flour, basil, and salt to yeast mixture. Using an electric mixer, with dough hook, knead dough about 5 minutes or until dough forms a ball. (You could do this by hand, it will probably take about 10 minutes.) If the dough is too sticky, knead in additional flour. Line two baking sheets with parchment paper; set aside. Turn dough out onto a lightly floured surface. (don't over flour the counter or you will have a heck of a time shaping these!) Divide dough into 18 portions. Roll each portion into a ball, and then a 9 inch long rope. Place the breadsticks on prepared baking sheets. Cover and let rise in a warm place until nearly double (about 40 minutes).
3. Preheat oven to 350. Bake for 18 to 22 minutes, or until golden brown. Place on wire racks. In a small bowl, combine butter and garlic powder; brush over warm breadsticks.
*One thing that is really great about these is that you can make them ahead of time and freeze them. Heat them up in the oven or microwave and they taste very fresh! If you decide to do that, I would recommend not adding the garlic butter until you plan on serving them. They just taste better that way.
This is what the yeast mixture should look like after 5 to 10 minutes.
I think this dough is just beautiful. I know I'm kind of weird thinking dough is beautiful.
I will attempt to explain what I've learned about shaping bread dough. You don't want to over work the dough or else it will tear, and you will end up with broken and fallen breadsticks. Shape the dough into balls, just like I did in the above picture.
Keep track of the order you are shaping the dough in. Roll one ball out into a stick a little ways, not the full 9 inches, then put it aside to work on the next one. Do this with all of them until you get back to the first one. Now you can roll it out to the full 9 inches. Giving it a break while rolling out the others gives the dough a chance to rest and you won't have to force it into its full shape on the first roll out. Does that make sense? If you're lost and you really want to make these, my email is sandiroughton@hotmail.com. I would be more than happy to explain it further for you :)
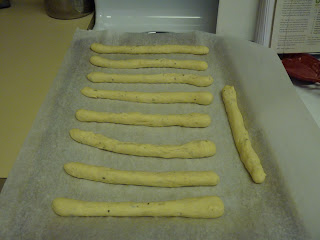
Here they are before rising...
...and after. As you can see they won't completely double in size, and if yours don't, that's okay! I set the timer for 40 minutes, as the recipe says, and then bake them after that. They are really going to expand once they get into the oven.

And here they are finished! Believe me, by the time you taste these with garlic butter on them, you're going to know that you blew those Olive Garden sticks out of the water :)


